Friday, April 21, 2017

Foreground Buildings

The five foreground buildings on the Tokyo side of the layout are simply 3-D shapes built up from foam core and covered with printouts of the building faces.

After determining the footprint of each building, I had to decide how tall each one would be. I didn't want them to dwarf the background buildings, so the maximum height would be about 5 inches. To provide some visual interest, I varied the heights of each building, alternating short ones and taller ones. I based the building heights on how many stories they would be, using a standard 10-ft story height.

Once I finalized the dimensions of the buildings, I used a computer to create the images I would later print out and glue to the building cores which would be made of foam core. Making the building "wraps" on the computer proved to be one of the most time-consuming activities, mainly because I was using a photo editing program (paint.net) that I was unfamiliar with. It was kind of like trying to fly an airplane while reading the instruction manual at the same time!

I created the images of the buildings' walls on paint.net using texture images from the website textures.com. I also used Google image searches to find windows and doors to round out the images. I wanted to include a couple of common Japanese convenience stores, Lawson Station and Family Mart, on the layout. I found suitable imagery for both and added them as first-story storefronts in the buildings on the left and right side. I added a Yoshinoya restaurant in the same manner on one of the middle buildings. Once I had created the four sides for each building, I printed them out on a color printer at my office (don't tell the boss! 😁).

Making the building cores was a fairly straightforward process of cutting sheets of foam core to the appropriate sizes and gluing them together with white glue. When cutting the pieces, I had to be careful to account for the thicknesses of the foam core so when the pieces were glued together, they would come out with the correct overall dimensions. 

For each building, I made four walls and the roof. I recessed the roofs down about 1/4" below the top edges of the walls to create a little parapet around the top of each building. I reinforced the joints by gluing strips of leftover foam core along the inside corners and edges. 

Completed building cores. The one in the foreground is finished, except for the black roof. The one on the right will have a curved corner and only the two edges of the foam core "floors" to help hold the shape of the paper "wrap". The one on the far left in the foreground will be a farm house on the Mt. Fuji side.

To break up the monotony of the plain blocky buildings, I wanted to give the building on the far right a rounded corner. This took a little while with doing the geometry calculations and borrowing my son's protractor, and at least one "do-over" for a piece that I cut the wrong size. In the end, it came out very nice.

Test-fitting building cores.

Building core test-fit, from another angle.

Once the building cores were finished, it was a simple matter of cutting out the printed "wraps" and gluing them to the cores with a glue stick. The last step was to hide the stark white rooftops by gluing pieces of black construction paper on them.

Finished foreground buildings in place!

That's it - pretty straightforward and quite effective. Now that I've seen how well it works, I plan to use this technique on my HO layout in the future. If I had more time, I'd take the next step of adding rooftop details such as air conditioning equipment and elevator shaft houses. That may be a little improvement project for the next show, but for now, it's on to the next task. International Day would only be a few days away at this point!


Sunday, April 16, 2017

City Streets and Sidewalks

With the background building flats planned out on the Tokyo side of the layout, I turned my attention to the foreground scenery. This would consist of some streets, some 3-D buildings, and some small grassy areas. With the background building flats in place, I took some measurements, sketched out the street layout and made room for a single row of 3-D buildings.

The basic street configuration would be one street running side to side between the background flats and the backside of the foreground buildings. Another street would run between the foreground buildings and the track. The two streets would connect with a "cross street" at either end of the block. The material for the streets was cut from gray sheets of thin spongy craft foam and glued to the layout with full strength white glue.

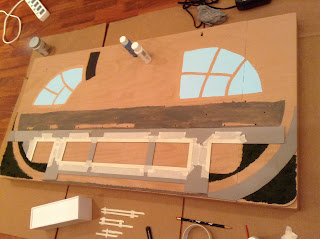
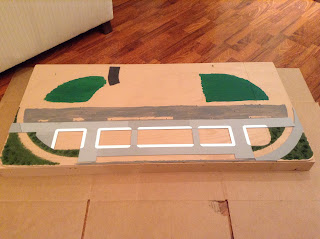
Initial street layout. The street material still needs to be trimmed where the Kato Unitrack roadbed would be placed. I painted the area behind the rear street with dark gray paint to hide the brown surface in the gaps between the background buildings. The white shapes are the back sides of the background building flats, and the wood dowels that hold them up are scattered around. You might be able to see the dowel sleeves made out of drinking straws on the backs of the building flats.

Cities aren't completely covered with pavement, so I wanted to add a little green space, maybe as a park or a vacant lot. The leftmost corner would be one such spot. To add a little visual variety, I made a curving street following the outside edge of the track in the right corner. I initially wanted to put a small building off that street in the right corner, but I ended up just covering the whole area with greenery.

After deciding on the sizes of the foreground buildings and marking off their footprints, I finished off the paved areas by adding a parking lot next to the building on the far left and adding alleys between the three buildings in the center. I then applied some Woodland Scenics ground foam and clump foliage to the open areas with diluted white glue to simulate grass and bushes. Finally, I added sidewalks along some of the streets by cutting strips from a thin white styrene (~ 0.010" thick) yard sale sign that I had in my hobby material stash. I glued these to the top of the gray foam streets using a thin layer of clear acrylic caulk.

Sidewalks and ground cover in place. The bright green areas on the other side were my initial attempt at rice paddies on the Mt. Fuji side. More on that in a later blog post. The small black shape on the other side is a section of a country road made from thin black craft foam.

At this point, I realized I should have painted the stark white sidewalks strips before applying them to the layout. I just created more work for myself by needing to mask them off later for painting. However, at this point it was less than a week before showtime and I convinced myself that I needed to get them in place ASAP and move on to another task.

After the adhesive caulk had dried overnight, I masked the sidewalks and painted them with tan-colored craft paint. The paint went on very thin, almost like a wash. I intended to go back with a second coat later, but I liked the way it looked after the first thin coat, so I left it that way.

Sidewalks masked off and painted. Six more strips will be installed along the edge of the back street in front of the background building flats - those are at the bottom center taped to the cardboard. One of the foamcore foreground buildings is at the bottom left - more on those in a later blog post. Also, notice the bright green rice paddies on the back side have now changed to sky blue - more on that in a later blog post! 😁

Monday, April 10, 2017

Background Scenery

As I mentioned previously, one half of the layout would feature a Tokyo city scene, and the other side would be countryside with Mt. Fuji as a backdrop. A double-sided backdrop would act as a center divider running down the middle of the layout, separating the two scenes.

I planned to use photos from the Internet as backdrops. I found a good panorama photo of Mt. Fuji to use on one side, and a good one of downtown Tokyo for the other side, then used paint.net photo editing software to size them appropriately. I also split the images into 8-1/2" x 11" size sections so I could print them on standard copy paper and splice them together onto the backdrop.

On the city side, to give some depth to the scenery, I planned to use a couple of rows of 2-D building photos in front of the backdrop, with some 3-D building models in the foreground. The 3-D buildings would be simple shapes made out of printed images laminated to foam core. (More on the 3-D buildings in a later post.)

Before my business trip, I scoured the Internet for appropriate building photos. I then used the paint.net software to straighten the perspective where necessary, re-size the images for N-scale, and arrange them in 8-1/2" x 11" groupings to make them easier to print. Once I had all my backdrop and building images in order, I saved them to a USB drive and printed them out at Staples while in the US.

After returning to Bahrain, I started work on the scenery. To make the center divider backdrop, I first had to mark off the clearances for the track and the train as it rounded the corners.

Checking clearances for track and trains.

Overall shot of the un-scenicked layout. This stage is known in the model railroading community as the "Plywood Pacific" Railroad. Alas, many model railroads never make it past this phase! The boxes for the train set and Kato Unitrack set are on the back side.

I made the center divider by laminating four layers of corrugated cardboard from large boxes together using white glue. I then used a glue stick to attach the background images to both sides. In retrospect, I could have just used two layers of cardboard instead of four. The extra thickness makes it almost twice as heavy, but does add a lot of sturdiness and stability.

To make the center divider easily removable, I glued three long, 5/16" diameter craft dowels between the middle layers, and drilled corresponding holes in the top of the plywood. To give extra lateral stability to the backdrop, I made sure to place the dowels and holes so they would go through the intermediate support stringers under the plywood. 

City side up showing the 3 mounting dowels and their corresponding holes down the layout centerline.

Backdrop in place, showing the country side and the Shinkansen in front of Mt. Fuji - the way it was meant to be rail-fanned!

I decided on two rows of 2-D buildings on the city side, with about 1.5" spacing in front of the backdrop and between each row. The back row would be individual high rises, which I printed to smaller than N-scale and roughly the same size as the foreground buildings on the backdrop. The front row would be mid-rises, roughly to N-scale. I wanted the mid-rise row to form a continuous line all the way across the layout to help hide the transition between the layout surface and the backdrop. My solution was to fill in the spaces between the mid-rise buildings with images of Tokyo city streets.

I glued the images of the buildings and the gap-filling street scenes to foam core using a glue stick, trimmed around the edges, then tested them out against the backdrop.


Making 2-D buildings. A finished high rise is on the far left, a finished mid-rise is left of center. Street scenes will fill the gaps between the mid-rise buildings.


Testing 2-D building positioning.

Once I found a configuration I liked, I glued the mid-rise buildings and street scenes together in groups of 2-3 for ease of handling. Then I marked the location of each high rise building and each mid-rise section on the plywood and drilled 5/16" holes for mounting dowels. 

For ease of transportation and storage, I didn't want to permanently attach the mounting dowels to the layout surface. I was also afraid if I glued the dowels to the foamcore buildings, the buildings would get destroyed during the process of installing and removing them from the layout. To get around this problem, I glued pieces of soda straw to the back sides to act as sleeves for the dowels to slide into. The dowels themselves are just held in place in the plywood by friction.


Friday, April 7, 2017

Cherry Trees, Part 4 - Foliage and Finishing Touches

After the tree armatures were finished, it was time to add the foliage. For the bulk of the foliage I started with the polyester fiber stuffing from a stuffed animal from the Dollar Tree.

No animals were harmed in the making of these model trees... only this stuffed rabbit... but just a little bit!

I had some stuffed animals as a kid, and the thought of cutting open this little guy and gutting him kind of pained me a little bit. I was really hoping to find a cheap throw pillow instead (less emotionally scarring!), but that particular day the Dollar Tree didn't have any pillows for sale.

As humanely as possible (!), I opened up just enough of the seam on the rabbit's side to pull out bits of poly fiber.

MINOR surgery in progress. The bunny would recover nicely, if not a little bit thinner :-)

Then I stretched out little bits of the fiber, dabbed a little full-strength white glue on the tips of the tree branches, spread the stretched fiber over them, and set them aside to dry.

Close up of the first few trees with the poly fiber added.

Happy little trees!

The next step was to add the pink foam, but this didn't go so well. Following instructions I had seen on the Internet, I first sprayed the white canopy with cheap hair spray that I picked up from Walmart. Then I sprinkled on some pink foam, and repeated the process to cover the tree.

Unfortunately, I couldn't get the foam to stick. After using about 1/4 the bottle of hair spray on my two test trees, I decided to throw in the towel and figure out a Plan B. I think part of the problem was the foam was way too coarse for this application, and was just to heavy to stick to the poly fiber. Another problem was probably due to my impatience in not letting the hair spray dry.

Pink foam fail.

I was a little frustrated that all that time and energy spent making the pink foam was a waste. But, hey, at least now I have a cool little blender I can make smoothies with! Maybe some time later on I'll try to run the foam through the blender again to see if I can chop it up to a finer grade. No time for that now, I have to think about what else I need to accomplish in the next couple of weeks!

After giving it some thought, my Plan B for the trees was to paint the poly fiber canopies directly. I first tried soaking a canopy in diluted pink paint.

Side-by-side comparison: dunked canopy on the left, my best foam-covered example on the right... meh...

The dunking method was OK, but still didn't quite look right, but I knew I was on the right track. I decided to load my trusty Badger airbrush with diluted pink craft paint and spray the white poly fiber canopies. Eureka! This actually turned out pretty well - good enough for the International Day event in 1 week, at least!


Foam-covered example on the far left, front row. Dunked canopy next to it. The rest have been spray painted with an airbrush.

Airbrushing did leave some minor paint "beading" on the poly fiber canopies, but after it dried, it looked OK and passed the all-important 3-foot rule. I went back later and touched up the pink overspray on the trunks with brown paint. I ended up using the "dunked" tree closer to the backdrop where it would be less noticeable.


Much happier little trees!
I still needed a way to attach the trees to the layout. I wanted them to be removable to simplify transporting the layout. I ruled out attaching them to little pins at the bottom because I'd have to drill a bunch of tiny holes in the plywood layout surface, and it would be impossible to find all the holes later on. I settled on simply placing them on top of the scenery, but their tiny wire loop bases were too unstable. To remedy this, I cut out a bunch of 1" circles from two clear plastic salad containers I swiped from a buffet restaurant near my office. I then used a dab of clear latex caulk to adhere each tree to the center of a plastic circle. This worked out really well, but given more time, I would have added some ground foam to the top side of the circles to cut down on their shininess and help them blend in with the finished scenery better.